
Integrate SonarQube with Jenkins
Devops-Proj-3: CI/CD pipeline for a Java application to deploy on a Kubernetes cluster using Jenkins
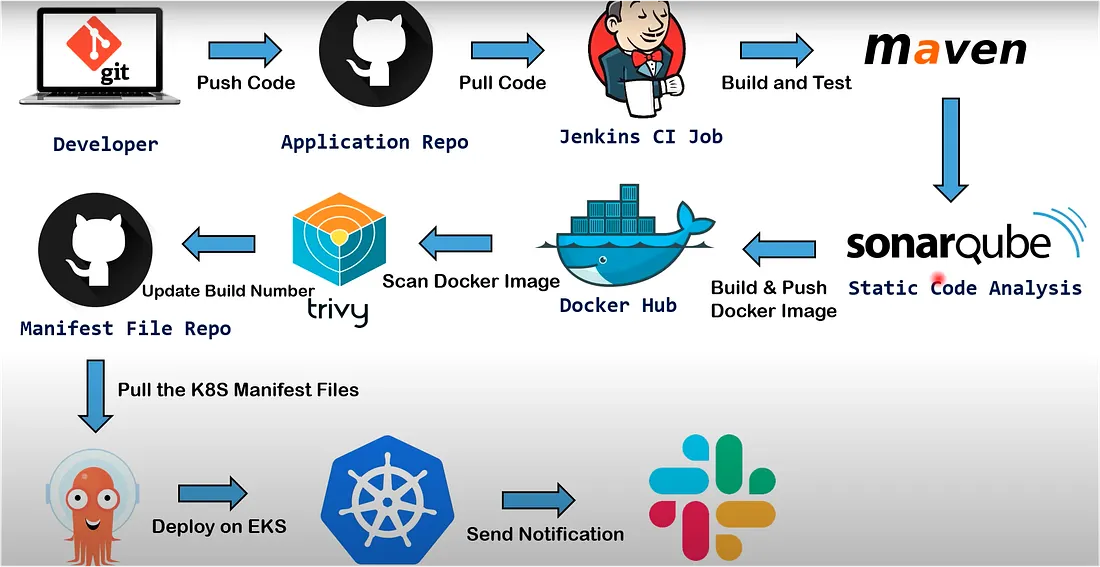
Project Description: Creating a CI/CD pipeline for a Java application to deploy on a Kubernetes cluster using Jenkins is a complex and multi-step process. In this blog post, we’ll walk through each step in detail, from installing and configuring the necessary tools to deploying the application on Kubernetes. We will also discuss the integration of Jenkins with SonarQube for static code analysis, Dockerizing the application, scanning Docker images with Trivy, updating build numbers in manifests, and deploying on EKS via ArgoCD.
Workflow Diagram
Pre-requisites
- Login to GitHub, Docker Hub and AWS Accounts
- Launch EC2 instances 3: Jenkins Master, Agent and EKS Bootstrap server
- T2 Micro for Jenkins master and EKS Bootstrap server; T2.medium for Agent
- Security Group: open All traffic (for practice only)
- Default VPC, RAM 15GB
- CI job code: GitHub Repo
- K8s manifest: GitHub Repo
Setup and Configuration
Jenkins Master Server
sudo apt update
sudo apt install openjdk-17-jre
java -version
sudo wget -O /usr/share/keyrings/jenkins-keyring.asc   https://pkg.jenkins.io/debian-stable/jenkins.io-2023.key
echo deb [signed-by=/usr/share/keyrings/jenkins-keyring.asc]   https://pkg.jenkins.io/debian-stable binary/ | sudo tee   /etc/apt/sources.list.d/jenkins.list > /dev/null
sudo apt-get update
sudo apt-get install jenkins
sudo systemctl enable jenkins
sudo systemctl status jenkins

open file : sudo vim /etc/ssh/sshd_config  - remove comment for below keys
PubkeyAuthentication yes
  AuthorizedKeysFile      .ssh/authorized_keys .ssh/authorized_keys2

sudo service sshd reload
Generate ssh key  : ssh-keygen

# Execute it when you setup agent machine
Copy id_rsa.pub file content to agent - /.ssh/authorized_keys (do not remove exisiting content just add it to new line)
Agent Machine
sudo apt update
sudo apt install openjdk-17-jre
sudo apt-get install docker.io
docker --version
sudo usermod -aG docker $USER
sudo init 6

open file : sudo vim /etc/ssh/sshd_config  remove comment for below values
  PubkeyAuthentication yes
  AuthorizedKeysFile      .ssh/authorized_keys .ssh/authorized_keys2

sudo service sshd reload
- Open Jenkins UI : http:<Public_IP_of_jenkinsmaster>:8080
- Copy initial password from cat /var/lib/jenkins/secrets/initialAdminPassword and install suggested plugins
- Install Below plugins
1]Docker
2]Docker Commons
3]Docker Pipeline
4]Docker API
5]docker-build-step
6]CloudBees Docker Build and Publish
7]Maven Integration Pipeline
8]Maven Integration
9]Eclipse Temurin installer
10]Maven Integration Pipeline
11]Maven Integration
12] Eclipse Temurin installer
13]onarQube Scanner
14]Sonar Quality Gates
15]Quality Gates
Master/Slave configuration
Manage jenkins - nodes - Build in node- configuration - no of executor - change to 0 and save it
Create new node- name(jenkins-Agent) - Number of executors 2
Remote root directory: /root/jenkins1
Usage: Use this node as much as possible
Launch Method : Launch agents via SSH
Host: Jenkins-Agent private IP
Credentials : add jenkins
          kind: ssh Username with private key
          ID: Jenkins-Agent
          Description: Jenkins-Agent
          Username: root  (as i generated ssh key for this user)
          credentials :
          Host Key Verification Strategy : non verifying
Integrate Maven to Jenkins and Add GitHub Credentials to Jenkins
Manage jenkins — tools — Maven installations — Name : Maven3 , Version: 3.9.4 Install automatically
JDK installations — Name: Java17 , Install from adoptium.net — Version: jdk-17.0.5+8
Add credentials for github — Credentials — new credentials
— kind: Username with password
— Scope: Global
— Usermame: github username
— password: github passwrd
— id: github
Install and Configure the SonarQube(On Jenkins Agent Machine)
Integrate SonarQube with Jenkins
sudo apt update
sudo apt install apt-transport-https ca-certificates curl software-properties-common
curl -fsSL https://download.docker.com/linux/ubuntu/gpg | sudo apt-key add -
sudo add-apt-repository "deb [arch=amd64] https://download.docker.com/linux/ubuntu focal stable"
apt-cache policy docker-ce
sudo apt install docker-ce
sudo systemctl status docker
sudo usermod -aG docker ${USER}
docker run -d --name sonarqube -p 9000:9000 sonarqube
docker ps
Integrate SonarQube with Jenkins
Login to sonarqube UI — :9000
default credentials: admin/admin
Go to my account- security — Generate Token — Name: jenkins sonarqube-token Type: Global analysis token
Jenkins — manage jenkins- credentials
— kind: Secret text
— scope: global
— secret : copy token which is generated in sonarqube-token
— ID: jenkins-sonarqube-token
Manage jenkins — system — SonarQube servers- SonarQube installations
Name: sonarqube-server
Server URL:
credentials : token
apply and save
Manage jenkins — Tools — SonarQube Scanner installations — Add SonarQube Scanner
name: sonarqube-scanner
tick on — install automatically
version: sonarqube scanner 5.0.1.3006
apply and save
Add sonarqube webhook configuration — Sonarqube — Administration- configuration — webhooks — create name : sonarqube-webhook
URL: http://:8080/sonarqube-webhook/
Build and Push Docker Image using Pipeline Script
Add Docker hub credentials
Manage Jenkins — Credentials — Kind: Username with Password
Create JENKINS_API_TOKEN
go to Jenkins — User login — configure — API Token — JENKINS_API_TOKEN
Copy token and keep on notepad
Manage jenkins- credentials —
Kind : secret text
Secret : provide token
ID and description: JENKINS_API_TOKEN
Save it
Create a CI JOB :
Jenkins create new job -pipeline
name: gitops-register-app-ci
Discard old builds : Max # of builds to keep 2
Pipeline: pipeline script from SCM :https://github.com/sagarkulkarni1989/register-app.git
Trivy Scan
sudo apt-get install wget apt-transport-https gnupg lsb-release -y
wget -qO - https://aquasecurity.github.io/trivy-repo/deb/public.key | sudo apt-key add -
echo deb https://aquasecurity.github.io/trivy-repo/deb $(lsb_release -sc) main | sudo tee /etc/apt/sources.list.d/trivy.list
sudo apt-get update
sudo apt-get install trivy -y
Create a IAM Role and assign it to Bootstrap server
AWS console — IAM — Roles- create role — AWS service — Service or use case — EC2 Add permissions — AdministratorAccess Role name : ekscluster_role
Go to EC2 instance- Bootstrap server — Action security — Modify IAM role — add newly created role
Create a cluster
eksctl create cluster --name virtualtechbox-cluster \
--region ap-south-1 \
--node-type t2.small \
--nodes 3 \

##It will take 10min to spin up cluster. for our practical we need 3 nodes
Kubernetes Setup (Bootstrap Server)
# Install AWS CLI
sudo curl "https://awscli.amazonaws.com/awscli-exe-linux-x86_64.zip" -o "awscliv2.zip"
apt install unzip
sudo unzip awscliv2.zip
sudo ./aws/install
aws --version

# install kubectl
curl -LO "https://dl.k8s.io/release/$(curl -L -s https://dl.k8s.io/release/stable.txt)/bin/linux/amd64/kubectl"
chmod +x kubectl
sudo mv kubectl /usr/local/bin
kubectl version --output=yaml

# Install eksctl
curl --silent --location "https://github.com/weaveworks/eksctl/releases/latest/download/eksctl_$(uname -s)_amd64.tar.gz" | tar xz -C /tmp
sudo mv /tmp/eksctl /usr/local/bin
eksctl version
ArgoCD Setup
#First, create a namespace
$ kubectl create namespace argocd

#let's apply the yaml configuration files for ArgoCd
kubectl apply -n argocd -f https://raw.githubusercontent.com/argoproj/argo-cd/stable/manifests/install.yaml

#Now we can view the pods created in the ArgoCD namespace.
kubectl get pods -n argocd

#To interact with the API Server we need to deploy the CLI:
$ curl --silent --location -o /usr/local/bin/argocd https://github.com/argoproj/argo-cd/releases/download/v2.4.7/argocd-linux-amd64
$ chmod +x /usr/local/bin/argocd

#Expose argocd-server
$ kubectl patch svc argocd-server -n argocd -p '{"spec": {"type": "LoadBalancer"}}'

#Wait about 5 minutes for the LoadBalancer creation
kubectl get svc -n argocd

# Get pasword and decode it

$ kubectl get secret argocd-initial-admin-secret -n argocd -o yaml
$ echo WXVpLUg2LWxoWjRkSHFmSA== | base64 --decode   ## password value can change

#Login to argocd - using load_balancer URL: admin/password(generated from previous step)

go to userinfo - change password

#Add EKS Cluster to ArgoCD

login to ArgoCD from CLI
$ argocd login a2255bb2bb33f438d9addf8840d294c5-785887595.ap-south-1.elb.amazonaws.com --username admin

$ argocd cluster list

# Below command will show the EKS cluster
$ kubectl config get-contexts

# Add above EKS cluster to ArgoCD with below command
$ argocd cluster add i-08b9d0ff0409f48e7@virtualtechbox-cluster.ap-south-1.eksctl.io --name virtualtechbox-eks-cluster
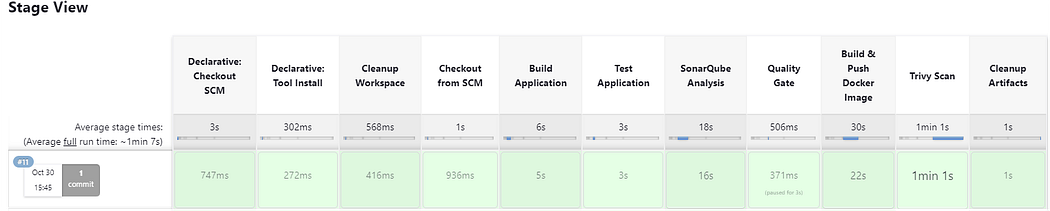
CI/CD Pipeline Flow
- Code pushed to GitHub triggers Jenkins pipeline
- Pipeline runs unit tests, builds jar
- SonarQube performs static code analysis
- Docker image built & pushed to DockerHub
- Trivy scans Docker image
- Manifest repo updated with new build tag
- ArgoCD syncs deployment to EKS
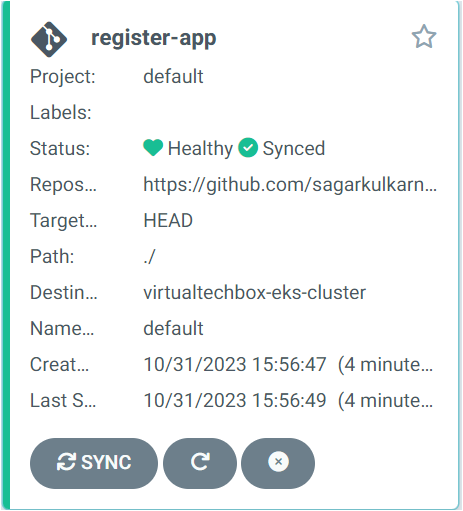
Configure ArgoCD to Deploy Pods on EKS and Automate ArgoCD Deployment Job using GitOps GitHub Repository
Login to argocd load balancer URL— Settings- Repositories — Connect Repo — VIA HTTPS Type git Project default Repsitory URL : https://github.com/sagarkulkarni1989/gitops-register-app
password : Generate personal access token and add here
Applications- New APP –
Application Name: register-app
Project Name : default
SYNC POLICY: Automatic
tick on PRUNE RESOURCES and SELF HEAL
Repository URL: select from drop-down
Revison : HEAD
Path: ./
Destination : Cluster URL : from drop-down
namespace: default
kubectl get pods

kubectl get svc
# Access the application
load-balancer URL:8080/webapp
Create a Jenkins CD Job
name: gitops-register-app-cd
Discard old builds : Max # of builds to keep 2
This project is parameterized : String parameterized: Name: IMAGE_TAG
Trigger builds remotely (e.g., from scripts): Authentication Token: gitops-token
Pipeline: pipeline script from SCM : https://github.com/sagarkulkarni1989/gitops-register-app
Press enter or click to view image in full size
Conclusion
This project demonstrates a fully automated CI/CD pipeline integrating Jenkins, SonarQube, Docker, Trivy, Kubernetes, and ArgoCD to deploy a Java application on AWS EKS.